West Elm Inspired Bench

I love West Elm! They offer so many home décor choices and their stores are stunning. I would buy the entire store, but I can’t, so in typical DIY fashion, I decided to use a West Elm piece as a DIY inspiration. The Slab Bench is a stone top with iron bottom can go with any décor both indoors and out. It is beautiful. Check it out: West Elm Slab Bench.

Since I am not a welder, I decided to use wood products instead to create the look.

My Materials:

  • A handy carpenter (my Husband)
  • Table Saw
  • Drill
  • One 2x4x92
  • One 2x12x4
  • 2 ½ -inch Wood Construction Screws
  • Level
  • Wood stain and/or paint color of choice
  • Wood filler (stainable)

Using your 2×4, first, cut four (4) 15 ¾” pieces using a 10 degree vertical (same direction) angle at each end. Then, cut two (2) 3 ½” pieces and two (2) 8 ½” pieces using a 10 degree inner (opposite directions) angle at each end. This completes the cuts for the legs. Sand, prime, and paint color of choice. I chose silver to it give the iron feel. Once the paint is dry, create the A-frame legs and drill two (2) screws at the top and two (2) screws at the bottom. It is important to use a level during this step to ensure the bench does not rock and make sure all edges are flush. Sink the screws into the wood. Fill the screw holes with wood filler, and touch up the paint.Bench

For the top of the bench, sand the 2x12x4. Make sure all edges are nicely rounded so you don’t get a splinter 🙂 Again, I used wood stain, but you can use any color of choice. Once it is dry, lay top side down, and measure 9” in from each end for leg placement. Use four (4) screws in each A-frame leg to safely secure.

image

Flip over and your beautiful bench is complete!

Bench

Patience for the Win

This one is for all of you that get discouraged about DIY projects and spending a ton of money. I want to share with you that anything DIY can be beautifully satisfying with a little patience.

Patience is bitter, but its fruit is sweet” – Jean-Jacques Rousseau

I found an ugly brass lamp at a “Going out of Business” Thrift Store. I paced the store several times before deciding to buy it and it ended up costing $0.25! Yes, a quarter!! If it didn’t work, I would be OK because I didn’t break the bank. I was extremely surprised when I got home, tested it and it worked! First win!! I cleaned it up and spray painted a glossy bright white. I am really bummed I didn’t get a chance to take a picture of the ugly thing 🙂

As many of you know, lampshades are the expensive part of the lamp. I searched and searched and just could not allow myself to spend over $30 for a $0.25 lamp. I did try reusing some older shades and updating. Check out my recent post on How to Update a Shade.  But, it just wasn’t the look I wanted. My search continued for 3 months until I came across a beautiful off-white shade at a local discount store. It was being sold “As-Is” for $6. There did not seem to be anything wrong, so I assume it was just missing the lamp… But I had a lamp at home. It was a perfect relationship. Second win!!

So, with a little patience and a few dollars, I created a beautiful lamp and I am very proud!

$6 Lamp

Let’s get Patriotic!

Using remaining pallet wood, I sanded and stained four boards using Winwax stain. I really like the look of the dark walnut… as you can tell by all my wood projects 🙂 Let dry overnight. To make white and red, I mixed each paint color with water and applied to wood. I wiped any excess paint so the stain would show through the color. After drying, I added mending plates to the back to connect each piece. I found some precut stars at a local craft store and glued them to the top to create an American Flag.Pallet FlagPallet Flag

So fun and patriotic!

A Shady Spot

Play tents and Tee Pees are everywhere these days. I love them, but not the price tags. I decided to do some searching on Pinterest and I found one that was easy and inexpensive.

My Supplies:

  • Four (4) 1x2s, Each 4 feet long
  • ¾ inch dowel
  • ¾ inch drill bit
  • Drill
  • Tape Measurer
  • 2 ¼ to 2 ½ yards of outdoor fabric
  • 2-ply Jute or Twine
  • Four (4) Large buttons
  • Sewing Supplies (needle and thread)

For the structure: Measure 6 inches from the top of each 1×2 and drill one ¾ inch hole in each. Insert dowel through two 1x2s at each end of the dowel. This will create an X at the top and should be a snug fit.

DIY Tent

For the Fabric: Drape your fabric over structure and measure. Cut any excess, but be sure to leave enough space for a seam. Sew a seam (approximately ¼ inch) on all sides of the fabric. Sew a button on each corner and drape fabric back over the structure. Measure approximately 6 inch length of Jute, make a loop knot at each end, and fasten each loop to the button of each leg of the structure.

DIY Tent

Really simple and low cost tent for those hot days outside or rainy days inside!

Tent

Yummy Cheesecake Recipe

Plain, traditional cheesecake is my favorite dessert. I have never attempted to make before, so I wanted to give it a shot. This recipe is combination of several I have seen on Pinterest and in my Betty Crooker cookbooks. Since it was my first time, I wanted to play it safe with pre-made crust!

It turned out great! Unfortunately, I was unable to snap pictures of the final product before it was all gone 🙂

Ingredients:Cheesecake ingredients

1 9-inch round graham cracker crust (pre-made)

3 8oz cream cheese (softened)

1 ½ cups of sugar

4 eggs (separated)

1 tablespoon of lemon juice

1 teaspoon of vanilla extract

Instructions:

Preheat oven to 325 oF. Combine cream cheese, sugar, egg yolks, lemon juice, and vanilla extract together in a bowl. Using an electric mixer, mix for approximately 2 to 3 minutes. In a separate bowl, mix/beat egg whites until creamy, approximately 3 continuous minutes. Fold egg whites into mixture.

Pour into crust and place on cookie sheet. Bake for approximately 35 minutes. Turn oven off and leave in for additional 30 minutes. Remove from oven and place into freezer for one hour to stop any additional cooking. Serve cold.

I had some left over mixture, so I used miniature graham cracker crusts and made a few small cakes.Extra Cheesecake Mixture

Alternatives:

Homemade crust-

1 ½ cups of graham crackers

5 tablespoons of sugar

1/3 cups of melted butter

Combine all ingredients and evenly cover pie pan or springform pan

Miniatures premade crust-

Same instructions as above, but reduce cooking time to 20-25 minutes, remove immediately and place in freezer.

Enjoy!!

Lamp Shade Update

Is your lamp looking drab? Before you spend a ton of money on a new shade, try a little DIY first. I have come up with a few ideas under $5 and you don’t even have to be crafty either.

Fabric: Fabric

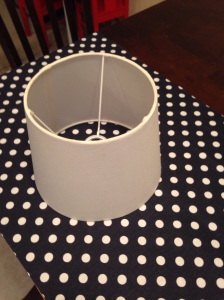
This is the fun one… the color of your existing shade does not matter. Choose a fabric that matches your current décor. Spray the fabric and shade with adhesive. Roll the shade on the fabric, evening out all the bubbles and wrinkles. Trim edges, apply a small line of glue on the inside edge, and fold over. Use clothes pins to hold the bond. Let dry overnight and you have a new shade in the morning! Working with the straight edges and smooth shade really make this one easy.

Embellishments: Embellish

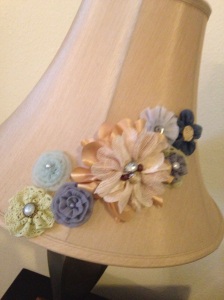
If you currently have a plain simple shade, try adding a few embellishments to it to update the look. This can include flowers, buttons, bows, or ribbon, and you can cover the entire shade or just a small portion of it. I picked up a matching set of flowers in the hair accessories section of my local craft store. Best part: they were already equipped with pins on the backs. I pinned to the shade and can switch out anytime without ruining it.

Paint:

Spray paint the inside or outside of the shade. If you have trouble covering evenly, try using a spray primer first, then cover with choice of color. Use painters tape or stencil to create designs or patterns. Spray paint is becoming my new friend.

Update that drab shade and don’t break the bank! At least if your DIY fails, you only spent a few dollars… and you can let me know on DIY Fail Friday 🙂

Lamp Shade


Campbell- Party of 2

This weekend I overheard a woman say the best advice she gives to young couples is “date your husband”. Her advice is so simple, but so true! We can easily get carried away with kids, housework, jobs, and our daily routines.  When my husband and I first married, we were young, just getting into our careers, and had limited responsibilities other than ourselves. Date night was every night of the week!

Campbell Wedding

Fast forward 7 years, two children, piles of bills (and laundry), and 45-50 hour work weeks, date night is really hard to come by. It can also be exhausting planning a date night out of the house too.  Finding the sitter, making sure the kids behave and are happy, then worrying that they are OK the entire time, all while you are on a time crunch, can really put a damper on your date.  Night after night, we find ourselves on the couch catching up on our favorite shows or reading.  This is great, but it was time to drop the excuses and make date night happen! Something out of our routine, a stay-at home date.

Campbell Family of 4

So one night a week, after the kids are asleep, we take time for each other at home. I have prepared this list of ideas for at-home dates with your love:

  1. Game Night- Play a board or card game together. If you are competitive like me, be careful in the choice of game! Scrabble is safe and really fun 🙂
  2. Have a Fondue night- Break out that fondue machine (it was most likely a wedding gift anyway!!). Don’t have one? You can use your slow cooker or a double boiler on the stovetop. Everyone loves Fondue right?!
  3. Puzzle- Start and complete a puzzle… you are a team!!
  4. Make a dessert together- It can be as simple as ice cream sundaes or homemade cheesecake. Try making the other persons favorite dessert.
  5. Movie Night- Pick a classic old movie, pop some popcorn, and snuggle up.
  6. Try a food tasting- Fancy chocolates or wine and cheeses or foods you have never tried before.
  7. Go Dancing- YouTube a how-to video or the Foxtrot or turn up your favorite and free style! Just don’t wake the kids!
  8. Paint or color- Chose a theme or idea and each of you create separate pictures. See who’s is better… That competitive side again:)
  9. Exercise together- We tried a hip-hop aerobics dance video together… let’s just say it was very entertaining seeing my husband “drop-it like it’s hot”!!!
  10. Moonlit Picnic – Grab that baby monitor, pack a snack, and head out to the backyard.
  11. Set up a Photo booth- Pull out the kids costumes and snap away.
  12. Go camping- Grab the blankets and flashlights, and set up camp in the backyard. Roast s’mores in the fire pit or grill. If the weather does not cooperate, move camp inside and build a fort with pillows and blankets.
  13. Happy Hour- Prepare a wine or beer flight.
  14. Go through old photos- Travel down memory lane together.
  15. Create a Spa Night- Break out the bubble bath and give each other the ultimate spa treatment.

There are tons of ideas on Pinterest, but this list will get you through the next couple of weeks. We really enjoy each other and our stay-at-home date night keep things fun and exciting for us and I hope it does for you too… So go date your husband!

DIY Pirate Costume

T ShirtWhat do you do when you are invited to a last minute Princess and Pirate Costume Party and are not prepared? Of course, we have enough princess dresses for a football team, but surprisingly, we lack pirate costumes in this house. We were invited to a party and costumes were a requirement. I sifted through piles and piles of clothes and found a few items I could turn into something. DIY Pirate

To keep it simple and comfortable, I started with jean shorts and red T-shirt. Then, I found a stained long sleeve shirt. I cut down center to make vest, and cut small triangles on each sleeve and bottom. I found some old black fabric, and cut two long strips: one for headscarf and another for a belt. I added the small triangles at each end of these too. Added his play sword and he was the cutest pirate around!

Pirate and Princess


Row, Row, Row Your Boat

Jo-Ann Fabrics has really stepped up its game. The pre-cut wood pieces are great for the challenged DIYer. In my most recent adventure to the store, I came across small boat oars.Joann Oars I have searched for these for years at antique shops and was really surprised to find them there. I have been inspired by Pottery Barn Oars  and really wanted to duplicate for my sons nautical room, but not spend a fortune.  So I took the plunge and after a coupon, they were $4 each.

SN: note the pre-cut arrows in the picture…. this would have saved me a step or two a few weeks back in DIY arrows…. Sigh!

First, I primed using Kilz Latex Primer, and covered each one with a solid color of choice. Then, I used painters tape to create lines. This is where you can get creative with straight lines or any design of choice. Once dried, I installed simple picture toothed hangers to the back and hung proudly in my sons room! He now sings Row, Row, Row your Boat every night before bedtime:)

Painted Boat Oars


Nautical

The Beauty of Chalk Paint

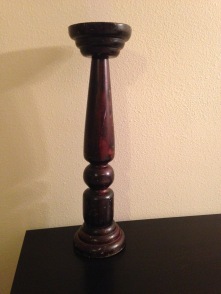
A few months back, I attempted to cover a serving tray with Chalk Paint.  It did not turn out exactly the way I envisioned, so I gave up on Chalk Paint.  Looking back, I should have done more research on the process.  So, this past weekend, I gave it another shot.  The victim: a set of wood candle holders I picked up a few years ago. Over the years, they survived falling from a console table (multiple times), getting knocked over on a daily basis, and two toddlers. You could say they were in need of some love.Candle Holder

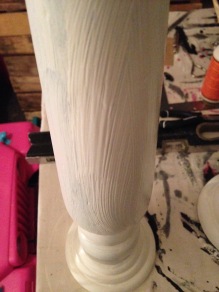
First, I cleaned each holder with soap and water and let dry. Then, I applied Folk Art Home Décor Chalk Paint (in Sheepskin color) from Joann’s Fabric and let dry overnight, and repeated this process for three total coats. Since the pieces were curved, I was worried about streaks. See some helpful tips below for more information.  Once the pieces were dry, I sanded by hand for distressed look…. sigh!

Chalk Paint Streaks

After dusting the pieces, I used a small paint brush to apply the wax. There are specialty brushes, but I missed that step! The Folk Art Home Decor Clear Wax has more of a liquid texture, which is different from other brands I hear. Once the first coat was applied, I used an old T-shirt to further spread and remove excess wax. I let dry overnight and repeated the same process the next day. I later discovered there are colored waxes, including “antique”, so I may update again in the near future.  Once the wax was completely dry, I used a soft cloth to “buff”.


Once those drab, dark, bruised candle holders are now fresh, bright, and ready for new life!

Here are some Chalk Paint tips that helped me:

  • Chalk Paint takes time. Make sure you allow a few days to complete the entire process
  • Sanding, priming, stripping is not necessary when using Chalk Paint, so get started already!
  • During your initial coat, it is perfectly normal to see streaks. Avoid overpainting.
  • Make sure your final strokes are in the same direction.
  • Two or three coats of paint are sufficient.
  • Waxing is important; it is acts as a sealant to the piece.
  • Use a lint-free cloth during the wax application process.
  • Two or three coats of wax is sufficient
  • Distressing can be done before or after your first coat wax application

Chalk Paint